dimanche 23 décembre 2012

First kilometers

So today, we make the first kilometers with the 33.
Yes, "we", as my brother-in-law is a mechanic i prefer that he drives for the first kilometers and i stay as passenger and observer.
The good news :
  • The test on the audio system was positive 
  • We finally find a convenient way to place the oil filter.
  • After 200km we don't have any mechanical issues (no water or oil leak at all).
  • Nismo submeter works well (so it means that i have an eletrical issue  or a faulty sensor as the oil temp indicator didn't move at all).
  • The blue led lights for aircon, submeters and speedometer are just as i want (thanks Aki for the idea).
  • The 3M carbon covered front lip looks good (thanks again to Aki for the idea)


The "less good news" (not really bad but still annoying)
  • trouble with oil temp sensor
  • trouble with airbag (light on the speedometer is permanently lightened)
  • Horn didn't work (but the fuse is good)
  • The tyres on stock rims are not so good (but I already ordered some Nokian WR A3 XL to solve this. So i will have stock rims with winter tyres  for winter time and 18" rims for the rest of the year)
Still some work to do but  now I can see the light at the end of the tunnel.

And to conclude, some pictures (a little crapy sorry).

The engine bay with the relocated oil filter.
 The 33 with her carbon covered front lips in winter configuration with stock rims

Merry Christmas to everyone and a happy new year.

@Aki : Thanks for your previous message but it seems that I can't answer it. Hope that i can add more (and better) pictures and news soon.

jeudi 20 décembre 2012

It's alive \o/


So the car has started again.
As you can see, there's still some work to do on the interior but it works.
The RB26 works smoothly and the car has done a few kilometers without trouble.

Still has to check oil sensor because the nismo oil temperature on the sub-meter didn't seem to work.
I will test it tomorrow with the OEM gauge.

If i can solve this part, i can finsih the interior and tune the audio parts.

So still some work but i'm relieved that the biggest part is behind me now.

dimanche 18 novembre 2012

Some news

Long time i didn't write something here. So let's correct this.

The rebuilding of the motor goes on, so far following parts are (re)installed:
  • N1 oil pump
  • N1 water pump
  • TOMEI Triple cam cover baffle plate
  • Intake
  • Nismo lightweight flywheel
  • Nismo sports clutch disc (coppermix)
  • Nismo oil cap
  • ...
 And the gearbox is also reconnected to the motor.
That leave the exhaust/turbo side still to do before we could put the whole lot in the car.


After some thinking, i decided to order a Trust Greddy(tm) Grex oil relocation system as i've seen that even with motor out of the car, the oil filter is not very accessible.

Normally, i will receive it next week so we can place it before placing the motor back in the car.

In the meantime, i found a V-spec (non A-LSD) rear diff' with half mileage of my actual so i bought it, give it some paint refreshment and installed it on the car.
I also gave some paint refreshment to the rear chassis bars and stabilizer as replacement with NISMO ones are not foreseen before next year.


If all goes well, first start will be during second week of december. Fingers crossed.

mercredi 19 septembre 2012

The RB26 is back...

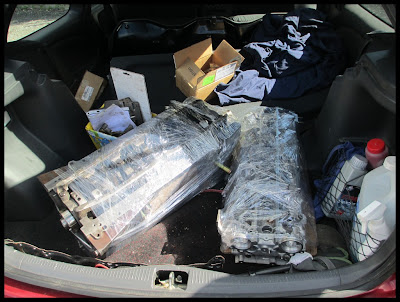
So today, I took back the RB26 from the first motor specialist (and I now can say that you could put a RB26 in a 2000 Toyota Corolla :p) .


But this is not yet the end  because the lower engine (with the NISMO flywheel ) should leave again soon to another motor specialist for balancing.
Only then we can start reassembling the giant lego.
Hope that I can give other news soon .

samedi 15 septembre 2012

One step further


 Hello eveybody

Pour les francophones, je vous invite à suivre mon sujet sur le forum skyline passion :
http://www.skylinepassion.fr/index/viewtopic.php?f=38&t=32
ou sur Japan car :
http://www.japancar.fr/forum/Sujet-nissan-R33-Gtr
Par facilité, je ne posterai plus qu'en anglais ici (sauf tuto éventuel).

As I already post on multiple forums in french, i will continue in English here.
So english  readers, don't hesitate to correct me if i make some mistakes.

So back to business :
Since last time, there was some evolution on the  part "motor".
I nearly received all the needed parts so the professional part of the rebuild had been launched.
Once balancing of the crankshaft will be achieved, the DIY part (with a lot of help from my brother in law to be honest) could start.

So in the meantime, I finished the installation of the amplifier (see below)

I must admit that there must have a more clean way to do it but as it will be hidden in the boot, if it works, that will be enough for me.

I also received some "non essential" parts but they will add some fun touch to the car:

-) Nismo Gauges and submeter (and some blue LEDs lights for it). / mounted today in the car


-) Mine's triple flow cam cover baffle plate / Mounted today in the covers 


-) Some more Nismo stuff and more led's


That's all for today. I hope that I could came back next month with pictures of the rebuild.

Thanks for reading

mardi 7 août 2012

Installation cloisonnement TOMEI

Premier jour de vacances = Installation du cloisonnement TOMEI
First day of my holiday = installation of the Tomei Oil baffle plate. For the english readers, sorry the rest will be in french as my technical english background is very poor. I assume that the pictures will speak by themselves.


1) Démonter le système d'origine (les vis en rouge doivent être conservées pour le montage du cloisonnement TOMEI, les bleues seront remplacées par celles forunies)


2) Démonter de l'axe de transmission côté roue gauche (il suffit de défaire les écrous, il y en a 5 au total si mes souvenirs sont bons). Attention, côté flasque, il y a des espèces de joints en carton qui serve de "cales" pour placer l'arbre correctement par rapport au planétaire. Personnellement, vu qu'ils étaient en bon état et pour éviter un réajustement, je n'y ai pas touché.

3) Démontage des bourrages d'extrémité (non illustré)

4) dépose des couvercles de la boite de transfert (pour enlever le tube qui gêne pour le perçage):

5) Sortir le planétaire (j'en ai profiter pour vérifier son état  )


6) Au moyen d'une douille (de 22?) d'une allonge et d'un marteau, pousser le tube depuis la boite de transfert. En deux petits coups de marteau, on a la place pour travailler:
Une fois cela fait, vérifier l'état des joints O-ring situé de part et d'autre (vu que mon moteur et peu kilométré, je n'y ai pas touché ).

7) Agrandir les trous  reliant les deux parties du carter comme recommandé par TOMEI (5mm) . A gauche, on peut toujours voir le trou d'origine. Je n'avais pas de mèche assez longue pour m'occuper de celui-là.
Attention a bien nettoyer de tous les copeaux d'aluminium avant de passer à la suite.


8) Installation du cloisonnement (d'abord mettre la partie avec les volets en caoutchouc et effectuer les retouches nécessaires):

9) Replacer le tube en l'introduisant côté opposé à la boite de transfert (attention, il y a un ergot)

10) Remonter les couvercles (commencer par celui d'extrémité côté roue vu qu'il sert de logement pour le roulement du planétaire). Pas de joint spécifique (à part un joint metal sur le couvercle côté roue) donc ne pas oublier de mettre de la pâte pour étanchéifier au remontage.
Personnellement, j'en ai également profité pour nettoyer les couvercles un peu même si c'est loin d'être parfait.


11) Il ne restera plus qu'à replacer 2 joints d'extrémité chez Nissan (38342-03V00 et 38432-03V10) pour terminer la partie carter.


vendredi 20 juillet 2012

Quelques nouvelles / some news

Hello,

Evolution un peu en stand-by. Il semblerait que mon fournisseur ait du mal à recevoir les coussinets ACL et vu que le motoriste va être en congé un mois, la partie moteur va devoir attendre.
En attendant, j'ai commencé à m'attaquer au démontage du carter pour la modification recommandée par TOMEI, fait un gabarit en carton pour le support de l'ampli et commandé quelques bidouilles sur RHD (voir plus bas):

No big news as it seems that my supplier has difficulty to get the ACL bearings and the guy who should start reassembling the motor will be on holiday for a month, the motor part will be on hold.
In the meantime, I began to dismantle the  "oil crankcase" (not sure of the translation here) for the modification recommended by TOMEI, made a cardboard template for the support of the amplifier and ordered some things on RHD:


Dans 3 semaines, je serai en vacances donc j'espère pouvoir avancer (et faire des photos) dans tout ce qui ne concerne pas le moteur proprement dit.

As i'll be on holliday in three weeks, I hope to go further (et make pictures) with all the non strictly motor parts.